
Let's start with the tutorial:
- Make sure you have installed the latest version of Java, to do so, open the "command window", type "java -version" and open this.
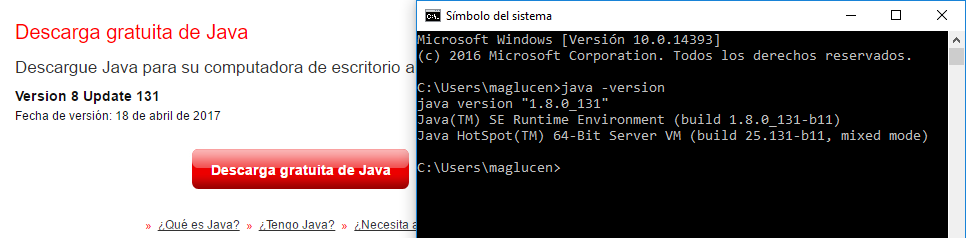
As you can see there, in my case, I have the latest Java Version, so I can continue with the tutorial.
- Download the server software from the official site or from here if the link has fallen
- Cut and paste the downloaded file into the folder you want the whole server to be installed (either the desktop or any other folder, but wherever you set it, take in mind that several files will be downloaded)
- Double click on the .jar and wait for some documents to be created (such as the config file)

- The first, and required, configuration you have to do is accepting the EULA. A text file call eula.txt is created in the application folder. Open this file in a text editor and change the line eula=false to eula=true. It means that you have read and understood the end user license agreement that you'll follow when using the software. If you don't do this, the server will shut down immediately when you try to start it.

- Double click on the .jar and the rest of the files needed will be installed.

- Now, if you want the server to run with more than the default memory (1024MB) or want the server to not use your graphic card, then you should create a text document ending in .bat and any name you would like ("launch" in my case). Copy and paste the followig code:
java -Xms1024M -Xmx2048M -jar minecraft_server.1.11.2.jar nogui
pause
Where "minecraft_server.1.11.2.jar" is the name of the original .jar launcher, "-Xmx2048M" the maximum quantity of MB the computer will use (RAM) and "nogui" if you want the server to not use your graphic card (delete it if you want to use the graphic card)
If you have choosen to create the "name".bat file, you have to start the server from there if you want it to be of some usage. (Remember to close the .bat and the server with the command stop, otherwise the map might not save)
With those easy steps, we have our own really basic server. Now let's move into the cofiguration section + linking it so others can play from our computer,
Setting up a VPN (Virtual Private Network)
Instead of letting anyone to join your server, there is another better way. Creating your own Virtual Private Network, which means that only the selected number of people you want, will be able to connect to your internet, so there are less security risks. This method may be deemed unrecommended, and an inconvenience for many users due to the fact that all users whom wish to connect to the server must download external software in order to join or create server. An alternative to this method is to port forward, but I won't cover it on this post.
The free version of Hamachi allows up to 5 connections (i.e. players), while the free version of Evolve allows an unlimited number of connections.
Setting up Hamachi.
- Install Hamachi on each computer that wishes to participate in the server, including the host.
- Windows / Mac
- Linux (32-bit and 64-bit .deb and .rpm packages are available, you can install it on Gentoo by emerging "net-misc/logmein-hamachi")
- The host server signs up for admin via the Logmein website.
- On the host machine, a new Hamachi network is created.
- The host installs and configures the Minecraft server software:
- The server IP field in server.properties is left blank (as default).
- The host passes the newly created Hamachi network credentials to each of the players.
- The players connect to the host's Hamachi network.
- Now that all the machines are connected within the same Hamachi network, the host gives their machine's Hamachi IPv4 address to the players.
- Each player connects using this IP as per the usual Minecraft multiplayer screen.
Setting up Evolve.
- Install Evolve on each computer that wishes to participate in the server, including the host.
- Windows
- Each computer participating must create an account on Evolve's website, whether they host the server or not.
- On the host machine, a new Evolve party is created. This can be done after logging in by opening the Friends window, clicking the red "Friends" tab, and clicking "Create Party..."
- The host installs and configures the Minecraft server software:
- The server IP field in server.properties is left blank (as default).
- The host adds each participating computer as a friend (Friends window > "Add Friend..." > enter the nickname of each computer, which was created in step 2) and then adds them in the party (double-click the party > "Send Party Invite" > enter the nickname of each friended computer. You must add them as a friend first, or they will not be added).
- The players connect to the host's Evolve party.
- Now that all the machines are connected within the same Evolve party, each player connects using the host's Evolve IP address (10.xxx.xxx.2, shown next to their name on the sidebar of the party) as per the usual Minecraft multiplayer screen.
- Evolve also doubles as a LAN bridger, so any singleplayer worlds opened to LAN can be accessed just as any other LAN server: at the bottom of the Multiplayer screen.
- The only advantage of being the party creator is that you can kick and ban players from your party. Any player in the party can host a Minecraft server.
- You can get help with setting up a party from the Evolve group chat room.
Connecting to the server
- If you are playing on the same machine on which the server is running, select the "Multiplayer" option in the game client, click direct connect, and then type in "localhost" instead of an IP address.
Both hosting and playing on the same machine is not a recommended practice unless you have a powerful computer (e.g. more than 6 gigabytes of ram (5 for the server, 1 for the client, and remainder for system).
- Users within your local network (i.e. that are accessing the same router) can connect using your internal IP address - port forwarding is not required for such local connections. The internal IP address of a specific network adapter can be found by typing "ipconfig" into command prompt and looking for the ipv4 address.
- People connecting from the Internet (i.e., outside of your local network) must connect using your external IP address. You must port forward for someone outside your network to connect to the server.
Configure your server
I will let the link over here as soon as I write it:


No comments:
Post a Comment